VAM 012 | Microphone Basics, Part 2 – Pickup Patterns
Welcome to episode 12 of the Voice Acting Mastery podcast with yours truly, Crispin Freeman!
As always, you can listen to the podcast using the player above, or download the mp3 using the link at the bottom of this blog post. The podcast is also available via the iTunes Store online. Just follow this link to view the podcast in iTunes:
http://www.voiceactingmastery.com/podcast
In this episode, I continue my explanation of microphone basics. Specifically, I talk about the directionality or “pickup pattern” of a microphone.
As little as 5 or 10 years ago, no voice actor needed to understand any of the details of how or why a microphone worked. However, in order to be competitive in today’s market, every voice actor is expected to have their own home recording studio. That means that you need to be able to produce professional sounding tracks yourself. It’s vital, therefore, to understand some of the basic attributes of microphones and how they function so that you can sound as good as possible.
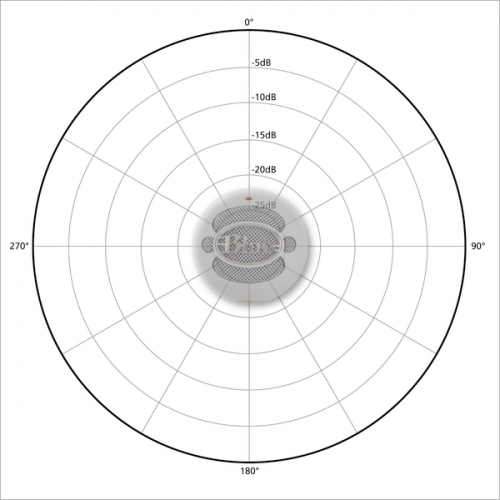
The directionality or pickup pattern of a microphone refers to how that mic treats sounds coming at it from different directions. Does the microphone capture all sounds equally from all directions, or does it prefer sound from one direction and reject sound from other directions? All microphones break down into two types:
- Omnidirectional Microphones
- Unidirectional Microphones
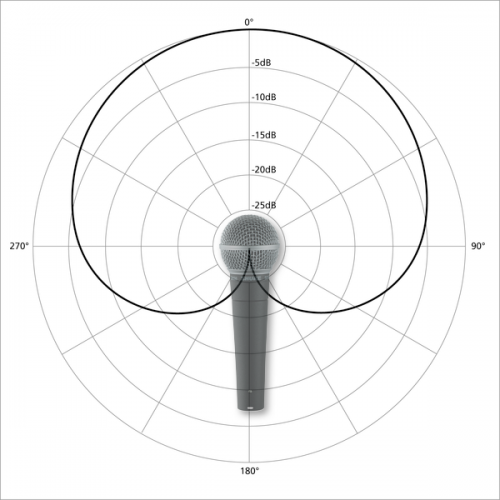
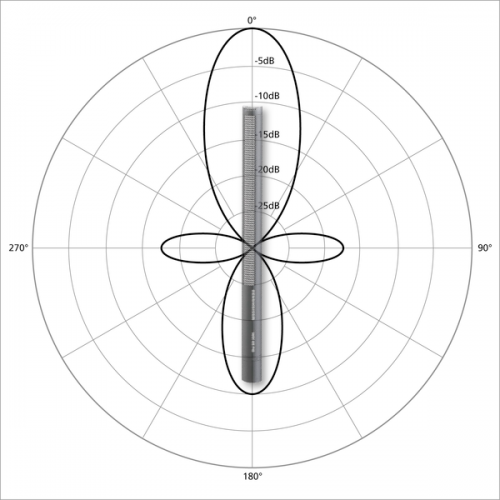
There are many different types of unidirectional mics, but the most common used in voice over uses a cardioid polar pattern. It’s named that because it favors sound from the front, but rejects sound from the rear. This creates a polar pattern graph that looks “pinched off”, almost like an upside-down heart. Another common pattern is the “shotgun” pattern that’s used for recording actors at a distance on TV and movie shoots.
Here are some pictures of the three polar patterns I mention in the podcast:

Omnidirectional Polar Pattern

Cardioid Polar Pattern

Shotgun Polar Pattern
All unidirectional mics, including the cardioid and shotgun patterns, also exhibit a behavior where the closer a vocalist gets to the microphone, the more bass or low frequency sound is recorded. This bass buildup is called Proximity Effect and can be used to create different effects when recording. I discuss all these topics at great length in the podcast. I hope you enjoy it!
If you have any questions, please post your question as a comment to this blog post. Chances are, someone else has a similar question. By posting your question here on the blog, I get to communicate with all of you at once.
Thanks for listening!
Download Voice Acting Mastery Episode #12 Here (MP3)
33 Responses to “VAM 012 | Microphone Basics, Part 2 – Pickup Patterns”
Trackbacks/Pingbacks
- Microphone Polar Patterns | A Pedagogical Guide to Sound Recording - […] Image source: http://www.voiceactingmastery.com/vam-012-microphone-basics-part-2-pickup-patterns […]

Just wanted to say thank you for taking the time to give us all this information.
I know it’s been said many times before, however it is so helpful to those of us starting out, especially like myself, who can’t afford direct lessons. What you suggested in the comments section of the last Episode on producing a book and online lessons sounds like a great idea too, when you have the time and resources to do so.
Being a busy person myself, I can’t imagine where you find the time to do this in such detail for free. Hopefully knowing how greatly appreciated it is and that you are mentoring the next generation of aspiring voice actors, is a good enough reward.
The things I find most useful –
1) Your insider tips based on years of experience.
2)The building of a network and voice acting community via the comments section – the links and tips I have picked up here from others has been invaluable so thanks to them too.
Best wishes,
Jess
Thank you so much for your kind words Jess! I totally plan on putting together some more formal educational materials in the future! Stay tuned!
I’m so glad you appreciate my insights. I’m also glad you enjoy the community that’s building up around the comments! Might I also suggest the Voice Acting Mastery Facebook Page:
http://www.facebook.com/pages/Voice-Acting-Mastery/107413269355517
I started it not long ago, and I think it might be a great place for people to share info!
Thanks Crispin.
I joined the Facebook page so hopefully we will get a little community started on there soon.
I wanted to open up a little discussion with you and others on the site on discovering and practising your ‘Character Type’.
You may have touched on this before so forgive me if we are covering old ground but it would be good to have peoples insights on this.
I find its a tricky one as its difficult to cast oneself objectively via ones voice when you are first starting out. Most of us don’t even know what we sound like to others because we hear our voices differently than everybody else does when we speak.
I’ve been trying out several ways to identify the characters I can most believable voice act, but I wanted to see what ideas and methods other people have come up with.
I was lucky enough to meet with anime expert Helen McCarthy in the summer while I was doing some voice recording for the Barbican Centre’s Studio Ghibli season. She advised me I’d probably be better at ‘Big Sister’, ‘mature heroine’ and ‘Old lady’ type roles because my voice has a more Mezzo/Alto quality. I agree, especially since listening to the recording and getting used to the actual sound of my voice (a bizarre experience!)
Since then I’ve been watching different anime and listening for characters who have similar voices and they do fit into those archetypes as one would expect. It’s also interesting to note the same actresses tend to be cast as those characters – a point you have noted on several occasions.
I try to practice the dialogue and match ‘lip-flap’ when I can, which I believe you might have mentioned as being a good practice tool. I’m also looking forward to studying the characters I find most interesting and doing my own interpretations of them vocally. From what I understand that is a quite rare opportunity for voiceactors working on anime to do as its usually recorded so quickly.
Just to summarize (without sounding too pedantic lol)
1) Familarising yourself with the actual sound/quality of your voice
2) Getting one/ preferably more objective opinions on your voice
3)Research
4)Practise
5)Finding roles you love as well as ones you could do commercially (it’s a business but you have to be passionate about it.)
Those are just my thoughts – anyone else??
Jess
Those are all great points. Recording your own voice, playing it back to yourself, and getting comfortable with how you sound is incredibly helpful. I was just reminded by a friend recently of how rarely normal people get to hear the sound of their own voice. Spend plenty of time recording yourself performing and listen back to your recordings with a critical ear. If you were casting a show, how would you cast yourself?
It is true that it can be very difficult to cast yourself objectively, but recording yourself is probably the best way to get used to hearing what you sound like to other people.
I will definitely be doing a podcast episode on typing yourself in the future! Thanks for bringing up such a great topic!
Excellent podcast as always, Mr. Freeman.
I’ve interned at a studio that does voice overs for commercials and I noticed that they had shotgun mics and the standard professional mics in the same booth. I thought, in my naivete, that all mics were the same in quality. Never thought they had different spectrum from the treble to the bass sounds.
Very useful to know!
For getting up close to the mic, how close are we talking? 6 inches? And how do you avoid puffs and peaking?
Many thanks, much love and I hope you had a wonderful Thanksgiving,
~Kalyn
When I get close to the microphone in the podcast episode and say “whisper in your ear” I’m only a couple of inches from the microphone. Usually I’m around 6 or 7 inches away when I’m talking normally. I turn my head slightly to the side as I approach the mic to avoid “puffing” the diaphragm, but I also use a popper stopper in order to help avoid plosives striking the microphone. You can find all sorts of inexpensive popper stoppers or microphone wind guards to buy online.
Hope that helps!
This podcast is really helpful for doing this now I know how to use the microphone properly by knowing what position i’m facing toward the microphone thank you
Sincerely,
Angel Marcos
Thanks for the info as always. This is actually my first exposure to how microphones work. It’s good to know.
Hi Crispin, thank you for all the help so far! You’ve already help me on my way to becoming a voice actor!
But my question was, is it fine if I have a unidirectional dynamic microphone to start voice acting?
Yes. As I said, in part 1 of the Microphone Basics episode, a unidirectional dynamic microphone can be useful, as long as you can amplify it cleanly so you don’t get a lot of noise when recording. I used a Sennheiser MD421 as my travel microphone and that is a unidirectional (cardioid pattern) dynamic mic.
Hey Crispin,
I was wondering about what type of recording system I could use to record a podcast? I’m a beginner so I don’t have alot of money to spend and I was wondering what type of headset I should use.
Thanks,
Katrina
Most podcasts are not recorded on headset microphones. Most podcasts are recorded on USB condenser microphones. Any one of the beginner microphones in the Toolbox section will serve you well. In fact, the Yeti might be best since you can change its polar pattern if you’re recording more than one person in the same room. Here’s the link to the Toolbox section:
http://www.voiceactingmastery.com/toolbox
If you absolutely want to use a headset microphone, you can, it just tends to pick up a lot of plosive sounds, like you’re on the phone. But it’s totally up to you.
The problem is that my friends and I are going to be in college so we will be in different countries so I can’t have a microphone that records more than one person in the room. Instead I need a microphone that can be plugged into a Mac laptop. Also, my friend is struggling to find a good recording system that is not expensive. I was wondering if you knew what type of recording system he should get and the type of mic I should get.
Thank you,
Katrina
I realize that you may not be interviewing more than one person in the room at the same time right now, but in the future, you may want to do that. That’s why it can be useful to have a microphone with different pickup patterns.
As I said earlier, I recommend the beginner microphones in the Toolbox section of this website. ( http://www.voiceactingmastery.com/toolbox ) Either the AT 2020 or the Blue Yeti. Both are USB mics that can be plugged directly into a Mac laptop. Both will work well for podcasting, but the Yeti will give you more flexibility for the same price.
In my experience, most headsets don’t sound nearly as good as a real condenser microphone. Headsets are designed to be inexpensive, not to do professional style recording. But if you’d rather use a headset, go right ahead.
I don’t know what you mean by “recording system”. You can use any of the USB microphones I recommend with the free program, Audacity, to record audio. Trust me. I suggest you read the Toolbox section of the website more carefully: http://www.voiceactingmastery.com/toolbox
Thank you and I appreciate for you taking your time to respond to this along with all of the other things that you do for your fans.
You’re very welcome. I appreciate your appreciation.
Hey, Crispin!
WOW, what a great podcast! Thanks for all the tips on how to chose a good microphone and why. It’s been on my mind lately, so I’m so happy that you’ve provided such a great resource for us on professional microphone types. And even gone one step further and even helped us understand the differences between them! Wow, what a great teacher.
Thanks a bunch! Talk to you soon! =D
Liz Chen
P.S. Your podcast on confidence was also so awesome that I ended up sharing it with a few friends who aren’t even into voice over professionally, ha ha. Thanks again! =D
Glad I could help! Also glad that you found the confidence episode so inspiring!
Take care!
When you say: “Most are designed for podcasting and are not suitable for voice acting,” what about them are not suitable if they sound professional or at least great?
Thanks in advance!
-Benjamin
Most USB mics are designed to sound relatively clear, but most of them cannot compete in terms of sound quality with professional level microphones. Most USB mics sound far to thin or tinny. They lack bass and they sound amateurish compared to true professional microphones. The microphones I recommend are the USB mics that I think are high enough quality to compete with non-USB professional microphones. The Shure PG-42USB can definitely compete with professional level mics. That’s why I bought one myself.
When recording Dubs do the engineers use a noise gate? (If not then how do you avoid back round hiss bleeding into the mic?) (If they do use a noise gate then what is a recommended attack and release setting to use for such application?)
How far do you stand from the mic when recording dubs?
Voice over recording engineers for dubs never use a noise gate. Noise gates are useful in the music world in order to keep instrument noise from one track bleeding into the mix, but if you’re having to use a noise gate on a voice over performance, your rig isn’t set up correctly.
If you’re getting a lot of hiss in your recording, either your levels are set wrong, your preamp is too noisy and doesn’t have enough gain to power the microphone you’re using or there’s some other problem in your recording chain. It’s also possible your recording booth is either not treated well enough acoustically or else it is not isolated enough from other sources of noise so external sounds are bleeding in to your recording.
Noise gates are a tool of last resort in the world of voice over and they always sound a little amateurish because it’s so hard to make them sound natural.
As far as distance, the rule of thumb is to take your right hand, make a fist, and then stick out your thumb and pinky fingers in a “hang ten” sign. Put your thumb to your mouth and your pinky towards the microphone. That’s about the distance you should be from the mic. It’s usually about 8 inches.
Hope that helps.
Thanks Crispin! BTW When I saw vision of escaflowne, the whole time I kept thinking that you would have been perfect for playing Allen. (Even before I knew you wanted to do his voice)
Why thank you! I still wish I could’ve worked on that dub! Oh well… 🙂
THIS. This is brilliant. Thank you so much. I don’t know how much it will help my non-existent voice acting career but it will definitely help in my current podcasting ventures. I did purchase a couple microphones a while back. An Audio-Technica ATR2500-USB and a Samson Go Mic Compact USB. They’re .. well, cheap, but they work well for what use they’re getting. I use the ATR mainly with a pop filter and the only issue I have is that it picks up EVERYTHING.. especially my breathing.
I’m so glad you found the episode helpful for your podcasting endeavors. The Audio Technica microphone is a large diaphragm condenser microphone so it will pick up the environment around you much more than a dynamic microphone. But it is far cheaper and has a built in USB interface. I don’t know of any dynamic microphones that have built-in USB interfaces. Your best bet is to use more acoustical treatment to minimize extraneous sounds.
You mention both wind guards and pop filters above. I am just getting started and have a Shure SM58 (with appropriate analog to USB connectors). Should I invest in both a wind guard and a pop filter or would you recommend one over the other?
Also, regarding the Shure SM58, I’ll be recording in a small room of my house lined with blankets. it’s not a proper sound dampening booth, but from what you say in the podcasts, it sounds like the Shure is a good choice because of its ambient noise reduction.
Although, I have the opportunity to purchase a friend’s Blue Yeti mic at a good price. I’m looking into it just based on your comments how the condenser mics pick up vocal nuances better. I also received a tip recently saying that since I don’t have a “proper” recording room, I could line a medium to large box with the sound dampening foam and place the mic in the box. I’d take that tactic with the Blue Yeti.
I know I should just let my ears be the judge, but from your professional experience, would the box tactic really work? Or would that dampen the sound too much? Should I stick with the Shure and the blanket-lined room?
Thanks so much for all your wonderful advice so far! It’s been a great help.
If by a wind guard, you mean a foam windscreen that goes over the SM58 like a sock, then I would say that a pop filter will color the sound of the microphone less than a foam windscreen. However, if you tend to be aggressive with your consonants or are going to be doing a lot of screaming, then you might as well use both. The color a foam windscreen will add to an SM58 is not much.
The box you describe with the foam inside is usually called a baffle box. One such example is Harlan Hogan’s Porta-booth or Porta-booth Pro, although you can build your own if you’re so inclined.
While I have never used a baffle box myself, I know many of my students who do. It certainly can help minimize any reverberation that your microphone might pick up from an untreated room. It will not provide you with any isolation so any bus that drives by or plane that flies over will be picked up quite well. But in terms of sound treatment, yes, I believe a baffle box will help.
I’ve always taken a room and treated the walls of that room with acoustical foam. That’s usually the best solution I’ve come up with.
Hope that helps.
Indeed it does help! Your advice is always well-thought out and very greatly appreciated. Thanks so much for taking the time to reply!
Hello,
Thanks a lot of this great podcast it is amazingly helpful.
I have a quick question,I check the tools sections and I saw that you recommended the blue yeti as a beginners mic which own so I wanted to try the whole proximity effect, but the result didn’t sound good at all, well, wasn’t close at all to that bit you did on the podcast when you were explaining the proximity effect, so is there a trick to make it right and a technique to record using the proximity effect ?
Thanks a lot and respect from Algeria and have a great day.
Hi there Tarek. The proximity effect happens as you get closer to any microphone that has a cardiod pattern. The Yeti is a multi-pattern microphone. You need to make sure that it is set to cardiod mode in order to get a proximity effect. Another trick you can do is as you approach the microphone, turn your head just slightly to the side so that you’re not speaking directly into the mic, but at a slight angle. This will keep your “P” and “B” sounds from popping the microphone when you’re that close to the microphone’s diaphragm. Hope that helps.
Thanks a lot, that would a great tip. good luck. and have a great day 🙂
This podcast was interesting. I just started out and I just bought myself a mike, but it’s a bit similar to the Omnidirectional image. Would this be a good one to practice voice acting with?